
When you picture a new roof, you probably picture the finished result: clean lines, fresh shingles, a house that looks ten years younger from the street.
But the part that decides how long that roof lasts is the part you never see. Most of a roof replacement happens beneath the shingles, and the quality of that hidden work is the biggest difference between one contractor’s roof and another’s.
Here’s what actually happens during a full roof replacement, step by step, and what to look for at each stage.
Before the crew arrives: inspection and planning
A good replacement starts before anything comes off the house. We walk the roof, check the attic, and look at the things that affect the scope of the job: pitch, number of layers already on the roof, ventilation, chimneys and skylights, and any signs of soft decking.
That inspection is what turns into your written estimate. It should spell out the shingle line and color, the underlayment, where ice and water shield goes, how ventilation will be handled, and how any decking replacement will be priced. If you’re comparing bids, our roof replacement cost guide covers what should be in a complete one.
Step 1: Tear-off down to the decking
On install day, the old roof comes off completely: shingles, old underlayment, flashing, and vent boots, down to the bare wood.
This is the loudest part of the job, and it’s also the most important. Until the old roof is off, nobody can see the decking. Years of small leaks around a chimney or in a valley can leave plywood soft or rotted, and that damage stays hidden under a roof that only gets patched or re-covered.
Step 2: Inspecting and repairing the deck
With the roof stripped, the crew checks the decking. Any sheet that’s soft, warped, delaminated, or rotted gets cut out and replaced before anything new goes down.
A new roof is only as solid as the surface it’s nailed to. Shingles fastened into damaged wood won’t hold the way they should, no matter how good the shingles are.
Most estimates include a set number of replacement sheets and price additional ones per sheet. That’s normal. You just want to know the number up front.
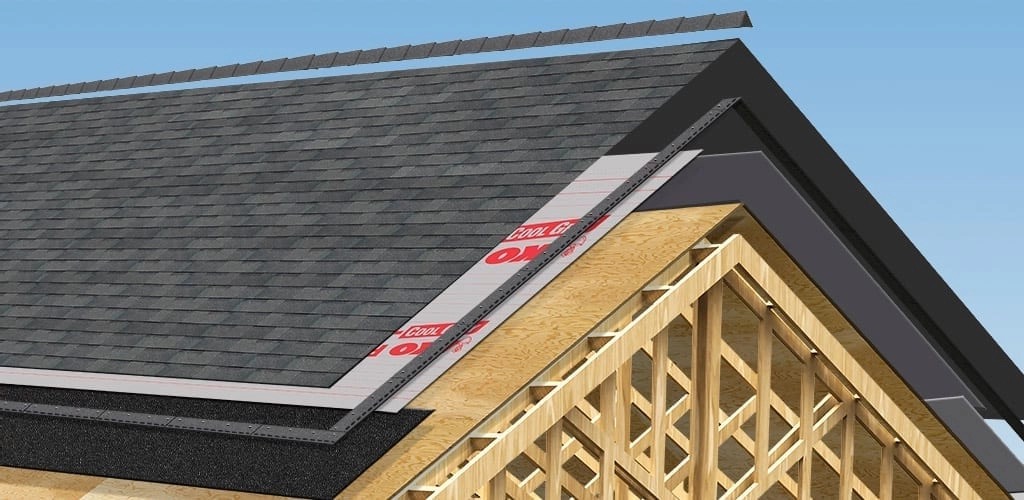
Step 3: Ice and water shield and synthetic underlayment
Next comes the waterproofing layer that sits under the shingles. It’s actually two different products, and they do different jobs.
Ice and water shield is a self-adhering rubberized membrane that sticks directly to the deck. It goes where water is most likely to get in: along the eaves, in the valleys, and around chimneys, skylights, and vents. When a nail goes through it, the membrane seals around the nail. In northeast Indiana, that’s what stops ice dams from pushing water under your shingles. Our guide to preparing your roof for Indiana winters explains how ice dams form.
Synthetic underlayment covers the rest of the deck. It replaced the old felt paper, which tears in the wind and wrinkles when it gets wet. Synthetic is stronger, doesn’t absorb water, and acts as a backup barrier if wind-driven rain ever gets past a shingle.
For a closer look at each of these layers, see the five layers behind your shingles.
Step 4: Drip edge and flashing
Flashing is the metal that seals the places where your roof meets something else: a wall, a chimney, a valley, a plumbing pipe. It’s where most leaks start, which makes it one of the most important details on the roof.
On a full replacement, all of it should be new:
- Drip edge along the eaves and rakes, so water runs into the gutter instead of behind it
- Step flashing where the roof meets a sidewall
- Chimney flashing, sealed and counter-flashed into the masonry
- Valley protection where two roof slopes meet
- New pipe boots around plumbing vents, which often crack long before the shingles wear out
Reusing old flashing to save time is one of the most common shortcuts in roofing, and one of the most common reasons a “new” roof leaks.
Step 5: Ventilation
A roof isn’t just a lid on the house. It’s part of how your attic breathes. Cool air comes in through vents at the soffits, and hot, moist air leaves through a ridge vent at the peak.
When that system is out of balance, heat builds up in the attic in summer and bakes the shingles from below, and moisture condenses in winter and rots the wood. A replacement is the right time to fix it, because the roof is already open. Most shingle manufacturers also tie their warranty coverage to proper ventilation.
We covered this in detail in our guide to attic ventilation.
Step 6: Shingles, nailed to spec
Only now do the shingles go on, starting with a manufactured starter strip at the eaves and working up to ridge cap shingles over the ridge vent.
How the shingles are nailed matters as much as which shingles you choose. Every manufacturer specifies how many nails each shingle needs (typically four, and six for high-wind installations) and exactly where they go. Nails placed too high, too low, or driven at an angle are a leading cause of shingles blowing off in a storm. We use heavy-duty, corrosion-resistant ring-shank nails, which grip the decking far better than smooth nails.
When every component comes from one integrated system and goes on to the manufacturer’s specifications, the parts are designed to work together instead of being pieced together from whatever was on the truck.
Step 7: Cleanup and final walkthrough
A roof replacement throws off a lot of debris. A proper cleanup includes hauling away the old materials, clearing the gutters, and running a magnetic sweeper over the lawn, driveway, and beds to pick up stray nails.
Before the crew leaves, there should be a final inspection of the finished roof and a walkthrough with you, so you can see the work and ask questions.
How to prepare for your roof replacement
A few simple steps make install day easier for everyone:
- Move vehicles out of the garage and driveway the night before.
- Take down wall hangings and mirrors on upper floors. Vibration from the tear-off can shake them loose.
- Cover items in the attic with old sheets. Some dust and debris will fall through during tear-off.
- Move patio furniture, grills, and potted plants away from the house.
- Plan for pets and kids. The noise is constant, and the yard is a work zone until cleanup is finished.
How long does a roof replacement take?
Most residential roof replacements in Fort Wayne take one to three days. A larger or steeper roof, a lot of decking replacement, or weather delays can stretch that out. You’ll get a timeline with your estimate.
Common questions about the roof replacement process
Do I need to be home during the roof replacement?
No, though most people like to be there at the start and for the final walkthrough. We’ll need access to the driveway and an outdoor power outlet.
What happens if you find rotted decking?
We replace the damaged sheets before installing anything new, and we’ll show you what we found. Your estimate tells you up front how decking replacement is priced.
Can a roof be replaced in the winter?
Yes, in many cases. Asphalt shingles seal best in warm weather, so cold-weather installs take extra care, and very cold or wet days can push the schedule back.
Is a full replacement better than putting new shingles over the old ones?
Yes. A layover hides the decking, keeps the old flashing, and adds weight. A full tear-off is the only way to inspect and repair what’s underneath. If you’re not sure your roof needs replacing yet, start with our list of 7 signs it’s time to replace your roof.
A roof is a system, not a shell
Your roof is one of the biggest investments you’ll make in your home. When it’s built as one integrated system, from the decking up, it protects the house for decades instead of years.
Allied Exteriors is a veteran-owned Owens Corning Preferred Contractor serving Fort Wayne and northeast Indiana. We pay as much attention to the parts you’ll never see as to the parts you will.
Schedule your free roof inspection, or browse our recent roofing projects to see our work.